Dialing-in Your AI with Optimizely Feature Experimentation

If you're in technology, AIs are everywhere nowadays. At work, I use an AI to help me make proofs of concept, sometimes in communicating with other AIs. At home, I use Google's Bard to help with those day-to-day mental chores such as meal planning. Even at play, when indulging in some Gran Turismo there's an AI to race against. I can't do anything about the AIs I use more casually (aside from being aware of them). At work though, I have some control! When interfacing with an AI through an API, you're given the opportunity to tweak parameters or try the same query with different contexts before getting a response from your AI. And what better to help judge your user engagement with an AI than Optimizely's Feature Experimentation!

Here I'll be working with OpenAI's API along with their client package from nuget in order to simplify some rather ugly setup. I'll include an HttpClient version of the call at the end of the post so you can see the details involved. 

In this demo, I'll be switching the AI model that my application uses, but this approach can be used on any of the parameters sent to the AI. Your basic OpenAI API call follows this format:

            client = new OpenAIAPI(apiKey);


            var parameters = new CompletionRequest

                {

                    Model = "gpt-3_5-turbo",

                    Prompt = promptText,

                    Temperature = 0.7,

                    MaxTokens = 100

                };

            var response = await client.Completions.CreateCompletionAsync(parameters);


            generatedText = response.Completions[0].Text;


This should look familiar to any developer that's used a client wrapper for an API. The connection details are handled by the client, but the business-end of the of request is the CompletionRequest parameters. Here's we're able to select the AI model we want to query against, as well as supply the context/prompt, as well as other details relevant to the AI setup. 

But what if we aren't sure that the model is the best fit for our purposes? Wouldn't it be nice to try out a couple different models and track metrics on them? Here's Feature Experimentation to help with that! 

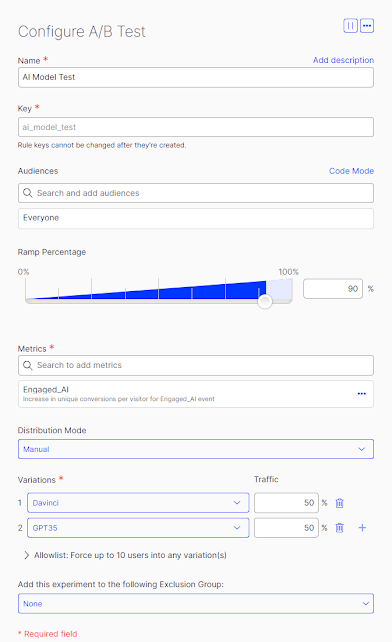
What I've done is set up an experiment that either sends the user's query to ChatGPT 3.5 or the Davinci model:


From there, we configure the Optimizely client back in our solution:

        optimizely = OptimizelyFactory.NewDefaultInstance(Configuration.GetValue<string>("Optimizely:SdkKey"));

        user = optimizely.CreateUserContext(numGen.Next().ToString());

        user.TrackEvent("Engaged_AI");


Now we can make our decisions on whether the user gets to interact with the chosen AI and which model they're conversing with, using Optimizely's Feature Experimentation.:

var decision = user.Decide("ai_model");

if (decision.Enabled)
{
    var ai_model = decision.VariationKey;
    var parameters = new CompletionRequest
        {
            Model = ai_model,
            Prompt = promptText,
            Temperature = 0.7,
            MaxTokens = 100
        };
    var response = await client.Completions.CreateCompletionAsync(parameters);

    generatedText = response.Completions[0].Text;
}
else{
    generatedText = "AI is not enabled for this user";
}

According to the experiment I've set up, 90% of my users will have the opportunity to interact with the AI, if they do their query will either be sent to ChatGPT 3.5 or Davinici and I'll be able to judge the level of engagement between my users and my AI. 

Here is also where you can add more context to the prompt to give the AI a better understanding of the query. This could help your AI understand its starting point, such as "you are a customer service agent for company A." 

Now as you introduce AI into your applications, you can see how both Feature Flagging and Feature Experimentation can help you evaluate your approach to AI. 
Comments

Popular posts from this blog

Config-Per-Site in Multi-Tenant Environments

Recently, a task was given to me at work where we needed a multisite configuration. We all know that multi-environment is as easy as appsettings.<environment_name>.config. What about in multi-tenant environments? You can't have appsettings.site1.config and appsettings.site2.config in your site! Well, not without a little extra work... Allow me to introduce  AddKeyPerFile ; this handy little function that you set up in your Program.cs will enumerate the files in a directory and add them to your Configuration.  "Alright!" you must be thinking "Show me how this miracle function works..." Well, let's get to it! First, you'll want to identify the config sections that will be unique to each site and put them in their own folder. I do this by site name because it makes the most sense by our conventions, if something else works for your practice, these names aren't set in stone.  Now, in order to suck those values into your config, there's one simp

The 1001st Piece in your 1000 Piece Puzzle: .NET Default Interface Functions

I was recently working with a client who wanted a reasonably large subsystem added to Optimizely that would add automated management to their content. While cutting the code for this, I found myself writing similar code across multiple classes. The reason why I had to write it that way was: 1) The client was currently on CMS11 and didn't have access to newer language features; 2) The hierarchy of the classes prevented me from inserting a common ancestor. Thankfully, .NET has expanded the functionality of interfaces, so we can take advantage of those within Optimizely. With .NET 5, Microsoft introduced default implementations on interfaces. Now interfaces can bring along a default implementation. Resulting in all classes that implement the interface can use the default implementation or override it with custom logic. Enough text! Let's code! Original Interface The following code is something that we'd create for an Optimizely experiment: using OptimizelySDK; using Optimizely

You Just Got Vectored! SVG Image Formats

 If you're reading this, then you've come across a need that nearly all Opti developers encounter in their careers; You need to display a vector image format (SVGs and the like) properly, the <IMG> tag just isn't going to cut it anymore. Post like this are a right-of-passage for Opti bloggers. "So," you think "if there are so many other blogs out there on the topic, why should I read yours?" Firstly, you enjoy my familiar and conversational tone of writing. Cary Elwes does the English accent, I do the nerd stuff. Second, you've already come this far, you might as well finish as this point, it's not long, I promise. To that point, and most importantly, I've seen some complex solutions out there, this one is a quick and simple implementation. 100% Guarantee! The VectorFile class: [MediaDescriptor(ExtensionString = "svg")]     public class VectorFile : ImageData     {         public override Blob Thumbnail { get => BinaryData;